小程序项目自我总结

序言

小程序: 相亲小红圈+

tool: wepy


传送门:

[ wepy ] https://tencent.github.io/wepy/document.html#/
[ Vue ] https://cn.vuejs.org/
[ ES6 ] http://es6.ruanyifeng.com/
[ git ] https://www.liaoxuefeng.com/

七月份结束,项目上线,回过头来整理一下项目,项目为wepy1.7.0后版本开发的小程序,配套的后台前端使用ant-design-vue开发,上传测试服工具使用Xshell6。

内容

  1. wepy构建工程具体可在wepy官网中查看,此处不多介绍。
1
2
3
4
$ wepy init standard my-project     /**创建项目*/
$ cd my-project /*进入项目目录*/
$ npm install /**安装依赖*/
$ wepy build --watch /*运行工程并监控项目修改自动刷新*/

wepy属于类Vue写法,要在wepy中使用异步操作(async/await)需要在工程的app.way入口文件中constructor函数中注册:

1
2
3
4
5
constructor () {
super()
this.use('requestfix')
this.use('promisify') /*←手动添加这个*/
}

生命周期:

应用生命周期

属性 type 描述 触发时机
onLaunch Function 生命周期函数–监听小程序初始化 用户首次打开小程序,触发 onLaunch(全局只触发一次)
onShow Function 生命周期函数–监听小程序显示 当小程序启动,或从后台进入前台显示,会触发 onShow
onHide Function 生命周期函数–监听小程序隐藏 当小程序从前台进入后台,会触发 onHide

页面生命周期

属性 type 描述 触发时机
onLoad Function 监听页面加载,一个页面只会调用一次 小程序注册完成后,加载页面,触发onLoad方法,参数可以获取wx.navigateTo和wx.redirectTo及中的 query参数
onReady Function 监听页面初次渲染完成,代表页面已经准备妥当,可以和视图层进行交互 首次显示页面,会触发onReady方法,渲染页面元素和样式,一个页面只会调用一次
onShow Function 监听页面显示,当redirectTo或navigateBack的时候调用 当小程序有后台进入到前台运行或重新进入页面时,触发onShow方法。
onHide Function 监听页面隐藏,当navigateTo或底部tab切换时调用 当小程序后台运行或跳转到其他页面时,触发onHide方法
onUnload Function 监听页面卸载 当使用重定向方法wx.redirectTo(OBJECT)或关闭当前页返回上一页wx.navigateBack(),触发onUnload。

版本更新

版本更新代码,一般较为固定,直接复制在 onLaunch 生命周期内

1
2
3
4
5
6
7
8
9
10
11
12
13
14
15
16
17
18
19
20
21
22
23
24
if(wx.canIUse('getUpdateManager')){
const updateManager = wx.getUpdateManager();
updateManager.onCheckForUpdate((res) => {
if(res.hasUpdate){
updateManager.onUpdateReady((res) => {
wx.showModal({
title: '更新提示',
content: '新版本已经准备好,是否重启应用?',
success: function (res) {
if(res.confirm){
updateManager.applyUpdate()
}
}
})
})
updateManager.onUpdateFailed(function () {
wx.showModal({
title: '已经有新版本了哟~',
content: '新版本已经上线啦~,请您删除当前小程序,重新搜索打开哟~'
})
})
}
})
}

组件

组件复用

说明: 组件复用,在 同一个页面,一个组件多次复用且每次传入不同的数据源,但是表现出来的数据源全部一致,其他的数据并没有渲染上
原因: 组件名一致导致wepy认为是一模一样的组件,如此数据源也不会变动
解决: 组件异名化

1
2
3
4
5
6
import CompA from 'path'

components = {
CompB: CompA,
CompC: CompA,
}

这样,既可以重复运用组件

文字换行

小程序文字换行:

1
<text>第一行\n第二行\n第三行\n</text>

定时器

页面业务逻辑有需要用到倒计时功能,如下图。

1394956-20190624191512382-153916679.png

在页面中有需要用到倒计时或者其他定时器任务时,新建的定时器在卸载页面时一定要清除掉,有时候页面可能不止一个定时器需求,在卸载页面(onUnload钩子函数)的时候一定要清除掉当前不用的定时器
定时器用来做倒计时效果也不错,初始时间后台获取,前端处理,后台直接在数据库查询拿到的标准时间(数据库原始时间,T分割),前端需要正则处理一下这个时间:

1
2
3
4
5
6
let overTimeStr = data.over_time.split('T')
let time1 = overTimeStr[0].replace(/-/g,",")
let time2 = overTimeStr[1].replace(/:/g,',')
let overTime = time1+ ',' + time2
let overTimeArr = overTime.split(',')
this.countDownCtrl( overTimeArr, 0 );

最终把时间分割为[年,月, 日, 时, 分, 秒]的数组,(如果后端已经把时间处理过了那就更好了),然后把该数组传递给倒计时函数

1
2
3
4
5
6
7
8
9
10
11
12
13
14
15
16
17
18
19
20
21
22
23
24
25
26
27
28
29
30
31
32
33
countDownCtrl( time, group ) {
let deadline = new Date()//免费截止时间,月的下从0开始
deadline.setFullYear(time[0], time[1]-1, time[2])
deadline.setHours(time[3], time[4], time[5])
let curTimeJudge = new Date().getTime()
let timeJudge = deadline.getTime()-curTimeJudge
let remainTimeJudge = parseInt(timeJudge/1000)
if( remainTimeJudge < 0) {
log('倒计时已经过期')
return;
}
this.interva1 = setInterval(() => {
let curTime = new Date().getTime()

let time = deadline.getTime()-curTime //剩余毫秒数
let remainTime = parseInt(time/1000) //总的剩余时间,以秒计

let day = parseInt( remainTime/(24*3600) )//剩余天
let hour = parseInt( (remainTime-day*24*3600)/3600 )//剩余小时
let minute = parseInt((remainTime-day*24*3600-hour*3600)/60)//剩余分钟
let sec = parseInt(remainTime%60)//剩余秒
hour = hour < 10 ? '0' + hour : hour;
minute = minute < 10 ? '0' + minute : minute
sec = sec < 10 ? '0' + sec : sec
let countDownText = hour+ ":" +minute+ ":" +sec
if( group === 0) { //个人业务逻辑,因为一个页面有两个倒计时需求,代码复用区分
this.countDown = countDownText;
} else if( group === 1 ) {
this.countDownGroup = countDownText
}
this.$apply()
}, 1000 );
}

至此,倒计时效果处理完毕,PS:终止时间一定要大于currentDate,否则显示会出现异常(包括但不限于倒计时闪烁、乱码等)

最后,退出该页面去其他页面时,一定要在页码卸载钩子中清除倒计时!!!

1
2
3
onUnload() {
clearInterval(this.interva1);
}

组件传值

组件传值和Vue有点细微区别,Vue强调父组件的数组和对象不要直接传到子组件使用,应为子组件可能会修改这个data,如图:

1394956-20190726100326596-647701209.png
但是,wepy中,有时候确实需要把一个对象传递到子组件使用,单个传递对象属性过于繁琐,而且!!!如果单个传递对象的属性到子组件,如果该属性是一个数组,则子组件永远会接收到 undefined 。此时最好用整个对象传值替代单个对象属性逐个传值的方法,且一定要在传值时加入 .sync 修饰符,双向传值绑定。确保从接口拿到的数据也能实时传递到子组件,而非 undefined

:circleMembersList.sync="circleMembersList"

阻止组件的点击事件传播
解决: 添加函数 catchtap=”funcName” 即可,funcName可为空函数,也可以直接不写

token判断

小程序调试时,有时候会出现首次打开无内容(拿不到数据)的状态,需要“杀死”小程序再打开才能看到数据内容,其中可能的原因之一便是 token 的失效。在与后台交互的时候,token必不可少。尤其是在小程序分享出去的链接,由其他用户点开分享链接进入小程序内部,此时更是要判断token,token的判断一般选在 onShow()钩子执行而不在 onLoad()钩子内执行。若不存在token,则应该执行登录去拿取token,再进行业务逻辑

1
2
3
4
5
6
7
8
9
10
11
onShow() {
const that = this;
if( !wepy.getStorageSync('token') ) {
wepy.login().then(async (res) => {
if(res.code) {
let code = res.code;
await that.login(code)
}
});
}
}

formid

微信提供了服务通知,即在你支付、快递等行为时,微信会直接给你发一个服务通知(模板消息)来提醒,每次提醒都会消耗该用户存储的formID,formID为消耗品,用一个少一个,只有通过用户的表单提交行为才可以积攒formID

1
2
3
4
5
6
7
8
<form @submit="submitForm" report-submit="true">
<button form-type="submit" class="editCard" @tap = "goModifiPage('editFormTab')">修改</button>
</form>

//js方法
submitForm(e) {
this.postFormId( e.detail.formId ) // 向后端传输formid
}

支付

准备: crypto-js.js && md5.js
微信支付流程为: 前端点击支付按钮拉起支付 ==》 准备加密数据 ==》 调用后端接口,传入需要的加密数据 ==》 后端验证加密数据,再返回加密数据 ==》 前端拿到后端加密数据(时间戳、内容、签名),对时间戳和内容进行本地签名,再判断本地签名和后端签名是否一致,若不一致,直接返回,退出支付,支付失败!若一致,对刚刚后台返回的content(内容)进行解析,拿到所需订单数据,前端拉起微信支付,参数传入刚刚解析数据 ===》 得到支付结果 success or fail !结束

1
2
3
4
5
6
7
8
/**
* 签名函数 Sign
*/
function sign(timestamp, content) {
var raw = timestamp + salt + content
var hash = CryptoJS.SHA256(raw).toString()
return CryptoJS.MD5(hash).toString()
}

前端点击支付按钮:

1
2
3
4
5
6
7
8
9
10
11
12
13
14
15
16
17
18
19
20
21
22
23
24
25
26
27
// 单独支付接口
alonePay(arg) {
const that = this;
if( that.buttonClicked === false ) return; //防止重复多次拉起支付
that.buttonClicked = false;
let mode = 1; //业务需求,我有五种不同模式支付
let appId = this.$parent.globalData.appId;
let content;
let sign;
const timeStamp = new Date().Format("yyyy-MM-dd hh:mm:ss").toString();
let code = wepy.getStorageSync('code');
wepy.login().then((res) => { //获取最新的code,可能这里没必要,具体和后端商量
if(res.code) {
let code = res.code;
log('code', code)
wepy.setStorage({
key: "code",
data: code
})
}
}).then( res => {
content = `mode=${mode}&app_id=${appId}`
sign = Sign.sign(timeStamp,content);
}).then(res => {
that.goCirclePay( that.circle_id, timeStamp, sign, content, mode )
})
},

支付函数:

1
2
3
4
5
6
7
8
9
10
11
12
13
14
15
16
17
18
19
20
21
22
23
24
25
26
27
28
29
30
31
32
33
34
35
36
37
38
39
40
41
42
43
44
45
46
47
48
49
50
51
52
53
54
55
56
57
58
59
60
61
62
63
64
65
66
67
68
69
70
71
72
73
74
75
76
77
78
79
// 支付函数,我前端有五种支付情况(单独、自己发起拼团、拼别人团、ios、免费五种支付),所以单独抽出支付,每次调用支付函数
goCirclePay( circle_id, timestamp, sign, content, mode) {
const that = this;
circleApi.goCirclePay({
data: {
circle_id,
timestamp,
sign,
content
},
getToken: true
}).then( res => {
log('支付res:', res)

let data = res.data
const SignServer = data.sign
const timeStampServer = data.timestamp
let contentServer = data.content
const SignLocal = Sign.sign(timeStampServer,contentServer);

if( mode === 0 && data.status === "success") {
that.nav('/pages/circleDetail?circle_id=' + that.circle_id)
return;
}

if( SignLocal !== SignServer ) {
log('签名不一致!')
wx.showToast({
title: "您已经支付过了",
duration: 1500,
image: "../images/common/icon_wxchat.png",
})
return
}
let contentArr = contentServer.split('&')
const timeStamp = contentArr[0].split('=')[1];
const nonceStr = contentArr[1].split('=')[1];
let index = contentArr[2].indexOf("=");
const package1 = contentArr[2].slice(index+1)
const signType = contentArr[3].split('=')[1];
const paySign = contentArr[4].split('=')[1];
wepy.requestPayment({
timeStamp,
nonceStr,
package: package1,
signType,
paySign
}).then(res => {
return new Promise(resolve => {
setTimeout(() => {
resolve()
}, 1000)
})
}).then(res => { //支付后promise,这里有成功和fail两种,fail在catch捕获,这里直接开始写支付success后的业务代码
that.buttonClicked = true;
let groupFormIdGet;
circleApi.getGroupFormId({ ////获取getGroupFormId
data: {
circle_id: that.circle_id
},
getToken: true
}).then( res => { //
let data = res.data
that.group_form_id = data.group_form_id
groupFormIdGet = data.group_form_id

if( mode === 1) {
that.nav(`/pages/paySuccess?circle_id=${that.circle_id}&shareLink=${that.shareLink}`)
} else if( mode === 2) {
that.nav(`/pages/paySuccess?circle_id=${that.circle_id}&group_form_id=${groupFormIdGet}`)
}
that.$apply() //脏值检查触发
})
}).catch(res => {
log('支付失败', res)
that.buttonClicked = true;
})
})
}

图片上传(七牛云)

更多图床网站请见我博客: https://www.cnblogs.com/fanghl/p/11419914.html
图片上传服务器采用七牛云服务,在app.wpy内小程序触发的时候,请求七牛云拿到token存为全局变量。

1
2
3
4
5
6
7
8
9
10
11
12
//app.wpy

onLaunch() {
//other code ***
// 七牛云,获取七牛云token
wepy.request({
url: 'https://****************/qiniu_token/',
header:{'content-type': 'application/json'},
}).then((res) => {
this.globalData.qiniuToken = res.data.token
});
}

导入七牛云文件
import qiniuyun from '@/utils/qiniuUploader'

base.js代码:

1
2
3
4
5
6
7
8
9
10
11
12
13
14
// 上传图片 base.js
const uploadImg = (imageURL, uptokenURL) => {
return new Promise((resolve, reject) => {
qiniuyun.upload(imageURL, (res) => {
resolve(res);
}, (error) => {
reject(error);
}, {
region: 'ECN',
domain: '填入域名',
uptoken: uptokenURL
});
});
}

页面结构

1
2
3
4
5
6
7
8
9
10
11
12
13
14
15
16
<!-- 上传生活照 -->
<view class="baseInfoTip" style="border: 0">上传生活照
<view class="imgUploadText">(最多9张)</view>
<view class="leftOriginLine"></view>
</view>
<view class="uploadImgBox">
<repeat for="{{images}}" index="index" item="item" key="index">
<view class="itemBox">
<image class="imgItem" src="{{item}}" mode="aspectFill"></image>
<image class="imgItemCancel" id="{{index}}" src="../images/common/icon_cardImg_cancel.png" @tap.stop="cancelUploadImg"></image>
</view>
</repeat>
<view class="itemBox" @tap="addImg" wx:if="{{!addImgCtrl}}">
<image class="imgItem" src="../images/common/icon_addImg.png"></image>
</view>
</view>

上传图片业务:

1
2
3
4
5
6
7
8
9
10
11
12
13
14
15
16
17
18
19
20
21
22
23
24
25
26
27
28
29
30
31
32
33
34
35
36
37
38
39
40
41
42
43
44
45
46
47
48
49
50
51
52
53
54
55
// 从相册选择照片上传
addImg(){
const that = this;
if( that.buttonClicked === false ) return;
that.buttonClicked = false;
wepy.chooseImage({
count:9 - that.images.length,
sizeType: 'compressed',
}).then(async(res1) => {
that.buttonClicked = true;
that.toast('上传图片中...','loading');
let filePath = res1.tempFilePaths;
for(let i = 0;i < filePath.length;i++){
let imgSrc= res1.tempFilePaths[i];
let imgType = imgSrc.substring(imgSrc.length-3);
let imgSize = res1.tempFiles[i].size;
if(imgSize > 2000000 || imgType === 'gif'){
that.toast('该图片格式错误!请重新选择一张', 'none', 3000);
continue
}
let res = await base.uploadImg(filePath[i], that.$parent.globalData.qiniuToken);
that.images.push(res.imageURL);
log('image长度:', that.images.length)
log('image:', that.images)
if( that.images.length >= 9) {
that.addImgCtrl = true
}
if(that.images.length > 9){
that.images = that.images.slice(0,9)
}
if(that.images.length >0 && that.config.fImages){
that.config.progress = that.config.progress + parseFloat(that.config.getConfigs.lifepicweight*100);
that.config.fImages = false
}
that.$apply();
// 上传用户头像列表
that.userInfo.photos = that.images
if(i === filePath.length -1){
wepy.hideToast();
}
}
}).catch((res) => {
if(res.errMsg === "chooseImage:fail:system permission denied"){
that.toast('请打开微信调用摄像头的权限', 'none', 3500)
}
})
},
// 取消图片上传
cancelUploadImg(e) {
if( this.images.length < 10 ) {
this.addImgCtrl = false
}
let index = e.target.id
this.images.splice(index, 1)
},

微信消息聊天布局

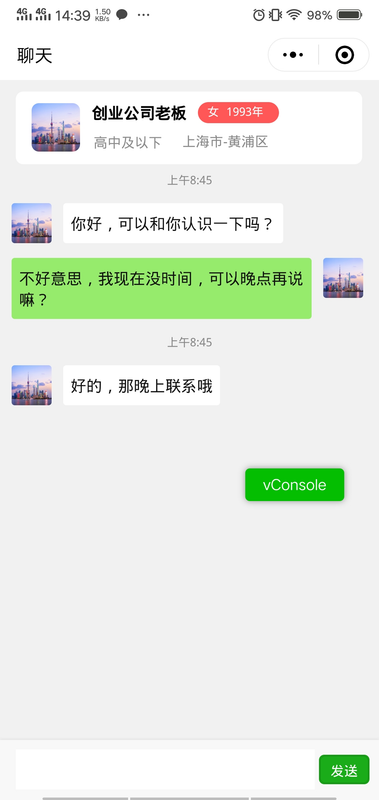
微信聊天框整体布局特点有: 接收方和发送方消息分别位于屏幕的左右两侧、最新的消息一定是在屏幕最底部、进入消息dialog页面一定是显示的最新消息,即页面滑动在最底部。这三个基本特征构成了微信聊天页面的布局原则。
先看效果图 (非最终效果):↓
1394956-20190620144053393-461267571.png
布局思路:flex反向布局

1
2
3
4
5
6
7
8
9
10
11
12
13
14
15
16
17
<!-- 格式化代码 -->
<view class="msgBox" id="msgBox">
<repeat for="{{talkContent}}" key="index" item="item">
<view class="msgItem {{item.send_user === configData.send_user ? 'msgItemReverse' : ''}}">
<image class="adverseHeadimg"
src="{{item.send_user === configData.send_user ? configData.user_img : talkAimerInfo.headimg}}"
mode="aspectFill">
</image>
<text class="textBox {{item.send_user == configData.send_user ? 'textGreen' : ''}}" selectable="true">
{{item.message}}
</text>
</view>
<view class="timeTip" wx:if="{{item.send_user != configData.send_user}}">
{{item.create_time}}
</view>
</repeat>
</view>
1
2
3
4
.msgBox{
display: flex; /*整体消息框flex布局,纵向取反布局*/
flex-direction: column-reverse;
}
1
2
3
4
5
6
7
8
.msgItem{                        /*消息item样式*/
position: relative;
display: flex;
flex-direction: row;
}
.msgItemReverse{ /*对方的消息样式,flex行取反布局*/
flex-direction: row-reverse;
}

保持页面始终滑动在最底部函数

1
2
3
4
5
6
7
8
9
10
pageScrollToBottom( msgLength ) {               //在页面需要进行变化时调用
wx.createSelectorQuery().select('#contentBox').boundingClientRect(function(rect){      // 使页面滚动到底部   
log('rect', rect)  
wx.pageScrollTo({
scrollTop: rect.bottom + msgLength*60,
duration: 80
})
log('msgBox的下边界坐标: ', msgLength )
    }).exec() 
}

自己发送的消息数据可以直接压入本地数组 talkContent 内,Unshift()进入,得到“负负得正”效果,即数据反,布局反即可得到从底部排列的布局。对方的消息从服务器拉下来的时候,放入 talkContent 内前 reverse() 一下即可

聊天页面input顶起页面相关

聊天input点击后,默认为顶起页面,也可以关闭默认选择不顶起。但是不顶起页面其实是input脱离当前page,会出现键盘上方没有我们的输入框!因为键盘不顶起页面,故不会影响之前的布局,输入框一般都在页面最底部。
解决: wx.onKeyboardHeightChange 监听键盘高度,严重不推荐input自身函数bindkeyboardheightchange,因为bindkeyboardheightchange 在手势上划隐藏键盘时Android是不会被触发的!!!
思路: adjust-position = "false"设置不顶起页面,在手动把内容展示view 的高度减少键盘的高度!在键盘拉起时,内容高度减少键盘的高度,在键盘隐藏式,回复原高度。最后的效果和微信原生聊天一样!
效果: Screenshot-20200305-175417.jpg
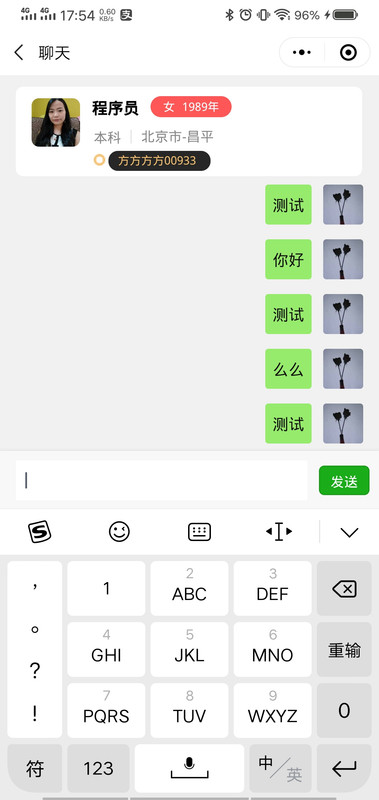
优化:在减少高度的同时,把内容页面滑到最底部,以展示最新消息!

1
2
3
4
5
6
7
8
9
10
<input class="inputContent" 
type="text"
value="{{userInputContent}}"
bindinput = "InputBlur"
adjust-position = "{{false}}"
hold-keyboard = true
confirm-hold = true
confirm-type = 'done'
@tap="onInpueChange"
>
1
2
3
4
5
6
7
8
9
10
11
12
13
14
15
16
17
18
onInpueChange() {
const that = this
that.scrollBottom()
wx.onKeyboardHeightChange(res => {
that.log(res.height)
that.scrollView.height = res.height *2 + 20
that.$apply()
})
}
// 页面滚动到底部
scrollBottom(){
const that = this;
that.scrollTopValue++;
setTimeout(function() {
that.scrollTop = that.scrollTopValue;
that.$apply()
}, 300);
}

CSS注意点

CSS持续补充中……
word-break: break-all; //换行文字,英文溢出
-webkit-overflow-scrolling: touch; //ios端启用硬件加速,解决ios端滑动粘手
catchtouchmove='true' //模态框中添加,禁止页面滑动
circleDynamic:last-of-type //特定类circleDynamic中最后一个元素
:nth-of-type(1/odd/even) //选择特定元素下第几个元素

1
2
3
 /* CSS 吸顶 */
position: sticky;
top: 0;

async/await

异步编程的终极解决方案,在小程序内拿取code或者login时会用到,await可理解为求值!async可理解为搭配await的语法,如果异步函数去掉await,返回的一般是 promise 对象,需要手动去rejectresolve

1
2
3
4
5
6
7
8
9
10
11
12
if( !wepy.getStorageSync('token') ) {
wepy.login().then(async (res) => {
if(res.code) {
let code = res.code;
await that.login(code)
wepy.setStorage({
key: "code",
data: code
})
}
});
} else {}

ios/android机型区别

由于微信小程序的运行规范限制等,一些在 Android 上可以存在的业务需求并不能原封不动在 ios 端运行,否则小心 封号警告 (此处手动滑稽.jpg),所以一般采取两个系统的用户进入某一个页面,展现不同的内容。
判断机型:在 app.wpy 入口文件中,onlaunch 生命周期内判断机型并保存到全局变量即可

1
2
3
4
5
6
7
8
getSystemInfo() {
const that = this;
wx.getSystemInfo({
success(res) {
that.globalData.userPlatform = res.platform;
}
})
}

分包

微信小程序官方限制小程序代码大小不得超过 2M ,在业务逻辑较多的情况下,查过2M后,我们可以采用分包加载。

1
2
3
4
5
6
7
8
9
10
11
12
13
14
15
16
17
18
19
20
//app.wpy
config = {
pages: [
'basePage1',
'basePage2',
'basePage3',
],
subPackages: [
{
root: 'dirName', //通常结构和
pages: [
'subPage1',
'subPage2',
]
}
]
}

//页面使用:
this.nav(`/dirName/pages/subPage1`)

canvas生成海报

小程序分享至朋友圈的海报制作过程,海报内容为动态获取,内容根据每个用户生成不同的海报

wx9fa47d9522cc0237-o6z-AJs4dg-UWPBIA6-I6-Ue-I2x-Dv-FC0-y-RUGs-RYHc-MF358fd1d3e53fca4c2ba42fe7422dee64d.png

如图,除了背景使用本地图片,其他的所有内容均为动态获取,且每次获取的不尽相同。

  • 图片先从网络图片下载到本地才可以渲染,如果开发工具可以正常显示,而真机无法绘制,那么请先检查你的 downloadFile 域名!!!

  • 绘制圆角-直角图片

  • 图片保存模糊

    1
    2
    3
    4
    5
    6
    7
    8
    9
    10
    11
    12
    13
    14
    15
    16
    17
    18
    19
    20
    21
    22
    23
    24
    25
    26
    27
    28
    29
    30
    31
    32
    33
    34
    35
    36
    37
    38
    39
    40
    41
    42
    43
    44
    45
    46
    47
    48
    49
    50
    51
    52
    53
    54
    55
    56
    57
    58
    59
    60
    61
    62
    63
    64
    65
    66
    67
    68
    69
    70
    71
    72
    73
    74
    75
    76
    77
    78
    79
    80
    81
    82
    83
    84
    85
    86
    87
    88
    //绘制文字
    drawTxt(fontSize, color, content, x, y, bold=false) {
    this.ctx.save()
    this.ctx.setFontSize(fontSize)
    this.ctx.setFillStyle(color)
    this.ctx.fillText(content, x, y)
    if (bold) {
    this.ctx.fillText(content, x, y + 0.3)
    this.ctx.fillText(content, x + 0.3, y)
    }
    this.ctx.setTextBaseline('middle')
    this.ctx.restore()
    }
    //绘制圆角图片(默认)-矩形图片
    getRectWithRadius(ctx, x, y, w, h, r, c, borderArgs = []) {
    // r > 0 则默认绘制圆角图片, r = 0 ,则绘制矩形
    //绘制圆形 则 r = 1/2 w || 1/2h
    //绘制任意直角 则 borderArgs = [leftTop, rightTop, rightBottom, leftBottom]控制
    let rate = this.rate
    let b = borderArgs
    ctx.beginPath()
    ctx.moveTo(x / rate, y / rate)
    b && b[0] ? '' : ctx.arc((x + r) / rate, (y + r) / rate, r / rate, Math.PI, 1.5 * Math.PI)
    b && b[1] ? ctx.lineTo((x + w) / rate, y / rate) : ctx.lineTo((x + w - r) / rate, y / rate)
    b && b[1] ? '' : ctx.arc((x + w - r) / rate, (y + r) / rate, r / rate, 1.5 * Math.PI, 0)
    b && b[2] ? ctx.lineTo((x + w) / rate, (y + h) / rate) : ctx.lineTo((x + w) / rate, (y + h - r) / rate)
    b && b[2] ? '' : ctx.arc((x + w - r) / rate, (y + h - r) / rate, r / rate, 0, 0.5 * Math.PI)
    b && b[3] ? ctx.lineTo((x) / rate, (y + h) / rate) : ctx.lineTo((x + r) / rate, (y + h) / rate)
    b && b[3] ? '' : ctx.arc((x + r) / rate, (y + h - r) / rate, r / rate, 0.5 * Math.PI, Math.PI)
    ctx.closePath()
    if (c) {
    ctx.fillStyle = c
    ctx.fill()
    }
    }

    // 保存海报
    savePosterToLocal() {
    const that = this
    // 获取用户是否开启用户授权相册
    wx.getSetting({
    success(res) {
    // 如果没有则获取授权
    if (!res.authSetting['scope.writePhotosAlbum']) {
    wx.authorize({
    scope: 'scope.writePhotosAlbum',
    success() {
    that.saveCanvas()
    },
    fail() {
    that.toast('右上角开启授权', 'none')
    wx.openSetting()
    }
    })
    } else {
    that.saveCanvas()
    }
    }
    })
    }
    //canvas保存至相册
    saveCanvas() {
    // 1-把画布转化成临时文件
    const that = this
    wx.canvasToTempFilePath({
    x: 0,
    y: 0,
    width: 560, // 画布的宽
    height: 996, // 画布的高
    destWidth: 1080 * 750 / wx.getSystemInfoSync().windowWidth,
    destHeight: 1920 * 750 / wx.getSystemInfoSync().windowWidth,
    canvasId: 'poster',
    success(res) {
    wepy.saveImageToPhotosAlbum({
    filePath: res.tempFilePath,
    success(res2) {
    that.toast('保存至相册成功', 'none')
    },
    fail() {
    that.toast('保存失败,稍后再试', 'none')
    }
    })
    },
    fail() {
    that.toast('保存失败,稍后再试', 'none')
    }
    })
    }
  • 多张图片下载
    网络图片下载成本地图片,且全部下载完全后才可以绘制canvas

1
2
3
4
5
6
7
8
9
10
11
12
13
14
15
16
17
18
19
20
21
22
23
24
25
26
27
28
29
let promise1 = new Promise(function(resolve,reject){
wx.getImageInfo({
src: that.posterData.matchmaker.qrcord,
success:function(res){
imgResource.qrcord = res.path
resolve(res);
},
fail:function(res){
reject(res);
}
})
})
let promise2 = new Promise(function(resolve,reject){
wx.getImageInfo({
src: that.posterData.matchmaker.qrcord,
success:function(res){
imgResource.qrcord = res.path
resolve(res);
},
fail:function(res){
reject(res);
}
})
})
Promise.all([promise1, promise2, promise3]).then(res => {
//开始绘制
const ctx = wx.createCanvasContext('poster')
that.ctx = ctx
}
  • 异常显示
    有时候Android手机会显示不完canvas,宽度异常,ios却没有该异常现象。其中一种可能就是设置canvas标签的宽高单位不一致,canvas内单位同一位 px ,把常用的 rpx 替换为 px

<canvas canvas-id="poster" style="width: 280px; height: 498px;"></canvas>

touchmove/onPageScroll动画效果
CE5813-B3-D648-4ab1-9-FE9-AD907-FF05203.png
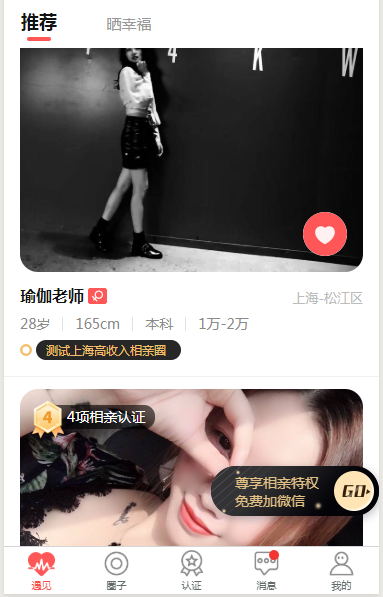
如图,右下角的按钮,一般会做这样的效果,当用户滑动列表时,该按钮向下滑动并隐藏,当用户停止滑动且页面亦停止滑动(非用户手指脱离屏幕)时,该按钮再从页面底部滑出。

  • touchmove、 onPageScroll

思路1: 第一种想法是touchstart时, 触发下滑动画,touchend时触发上划动画

缺点: tap点击事件也会先触发start 和 end 事件,故点击屏幕也会触发动画,且屏幕抖动,pass

思路2: touchmove 时触发动画,touchend时上划动画,

缺点:虽然避免了点击就触发动画,但效果不佳,手指离开屏幕,页面还在滑动,动画已触发。

最终解: 只用 touchmove 来判断用户滑动列表,再用 onPageScroll 配合 超时器 来处理页面停止滑动。

代码:

1
2
3
4
5
6
7
8
9
10
11
12
13
14
15
16
17
18
19
20
21
22
//template
<view calss="{{isSlide ? 'down-slide-hide' : 'up-slide-hide'}}"></view>

// data
data: {
isSlide: false,
timer: null,
}

//methods
touchmove(e) {
this.isSlide = true
this.$apply()
},
onPageScrool(e) {
const that = this
clearTimeout(that.timer)
that.timer = setTimeout(() => {
that.isSlide = false
that.$apply()
}, 400)
}

页面一直处于滑动时,超时器不会生效,只有在页面停止滑动后,超时器才生效,程序执行

录音

录音没有难度,上传语音采用七牛云服务,拿到临时路径经过七牛云拿到网络路径,在传给自己服务器。这里实现了一个圆环进度条(canvas),在录音时配合录音时长展示

1
2
3
4
5
6
7
8
9
10
11
12
13
14
15
16
17
18
19
20
21
22
23
24
25
26
27
28
29
30
31
32
33
34
35
36
37
38
39
40
41
42
43
44
45
46
47
48
//绘制进度条圆环
startRocord() {
...
this.countInterval()
}
drawCircle(step) {
!this.ctx && this.ctx = wx.createCanvasContext('progressBar')
let ctx = this.ctx
// ctx.clearRect(0, 0, 120, 120) //清除画布,(多次重复绘制需要。但绘制步伐过快会导致闪屏)
// ctx.draw()
ctx.setLineWidth(10)
ctx.setStrokeStyle('#FF5757')
ctx.setLineCap('round')
ctx.beginPath()
ctx.arc(60, 60, 55, -Math.PI/2, step*Math.PI - Math.PI/2, false)
ctx.stroke()
ctx.draw()
}
//进度绘制定时器
countInterval() {
this.countTimer = setInterval(() => {
if (this.count <= 600) { //绘制步伐,这里0.1秒绘制,很丝滑
this.drawCircle(this.count / (600/2))
this.count++
this.$apply()
} else {
clearInterval(this.countTimer)
this.count = 0
}
}, 1000 * 0.1);
}


//录音实例
initRecord() {
!this.RM && (this.RM = wx.getRecorderManager())
let RM = this.RM
RM.onStop(async res => {
//监听录音结束, res会返回录音信息(临时文件路径、时长、文件大小)
//七牛云上传临时路径
let result = await base.uploadImg(res.tempFilePath, wepy.$instance.globalData.qiniuToken)
...
})
RM.start({
duration: 60*1000,
format: 'mp3',
})
}

播音

createInnerAudioContext

用来播放各个用户语音,可以随时切换不同用户的语音播放,安卓规规矩矩没问题

ios播放异常

ios用户切换语音时会播放第一个音频,但随后的语音却不会播放,实例已经销毁,但貌似对ios无效。解决:单例模式创建实例,在销毁实例后,在将变量手动清空,可以解决ios新建播音实例无效问题。

1
2
3
4
5
6
7
8
9
10
11
12
13
14
15
16
17
18
19
20
21
22
23
24
25
26
27
28
29
30
31
32
33
34
35
36
37
38
39
40
//data
IAC: null,
isAudition: false,

/**
* src: 音频 cubicle:播放开关 index: 用户索引(不同音频) currentUser:当前需要播放的用户 lastUser: 上一个播放的用户 isAuditionStatus: 播放状态(未播放,正在播放)
* handleSound 监听新老用户播音,若IAC正在播音,此时继续点击同一用户,则暂停当前音频,若IAC未在播音,则播音当前用户。若点击不同用户,则暂停当前正在播音的用户,播放新用户录音。
*/
async handleSound(src, cubicle, index) {
if (this.currentUser !== index) {
this.lastUser = this.currentUser
this.currentUser = index
this.changeUser = true
}
if (this.changeUser) {
this.IAC && this.IAC.destroy()
this.IAC = null //ios这点不仅需要destroy实例,还要手动清空变量
this.lastUser != -1 && (this.recommUserList[this.lastUser].isAuditionStatus = 0)
!this.IAC && (this.IAC = wx.createInnerAudioContext())
let IAC = this.IAC
IAC.src = src
IAC.play()
IAC.onPlay(() => {
this.recommUserList[this.currentUser].isAuditionStatus = wepy.$instance.globalData.isPlaying = 1
this.$apply()
})
IAC.onStop(() => {
this.recommUserList[this.currentUser].isAuditionStatus = wepy.$instance.globalData.isPlaying = 0
this.$apply()
})
IAC.onEnded(() => {
this.recommUserList[this.currentUser].isAuditionStatus = wepy.$instance.globalData.isPlaying = 0
this.$apply()
})
this.changeUser = false
this.$apply()
} else {
cubicle ? this.IAC.play() : this.IAC.stop()
}
}

不管是录音还是播音,在页面卸载(onUnload)的时候清除掉实例或者初始化,有canvas也要清除画布

华为-textarea-层级异常

华为部分机型,对小程序的textarea标签支出并不友好,其textarea的内容以及 placeholder 内容恨天高,无法通过程序控制,甚至小程序官方说 canvas 的层级是最高的,但也没高过textarea!

问题: 盖在textarea上面的弹框会被textarea的内容穿掉盖不住,并且点击事件直接穿透

解决:在拉起盖在textarea上面的弹框(或组件)时,用 view 标签重写模仿 textarea 样式,并把 textarea 关闭掉。

持续更新…….

走过路过,留下买路财,壮士